Using your Personal Voice (along with system and novelty voices) in an iOS app
Text to speech has been around on iOS for over a decade, but Apple added a few new features in iOS 17 that could make interesting additions to your app. In this tutorial I’ll show you how to use AVSpeechSynthesizer to speak with the default system voices, the new “novelty” voices, and to even speak with the users own AI generated “Personal Voice”!
The motivation for this came about when a user of my Chaise Longue to 5K app asked me to add some sounds so they knew when to alternate between running and walking1. Whilst browsing some royalty free sfx libraries it occurred to me that there isn’t really a good way to signal “start walking” or “start running”; A single blast of a whistle for walk and a double blast for run? Instead, I decided that it might be better to use the text to speech features as then I could literally say “walk for 1 minute and 30 seconds” or “run for 3 minutes”.
To do this is relatively straightforward:
class Speaker: NSObject {

    static let shared = Speaker()

    lazy var synthesizer: AVSpeechSynthesizer = {
        let synthesizer = AVSpeechSynthesizer()
        synthesizer.delegate = self
        return synthesizer
    }()

    func speak(_ string: String) {
        let utterance = AVSpeechUtterance(string: string)
        synthesizer.speak(utterance)
    }
}

extension Speaker: AVSpeechSynthesizerDelegate {

    func speechSynthesizer(_ synthesizer: AVSpeechSynthesizer, willSpeakRangeOfSpeechString characterRange: NSRange, utterance: AVSpeechUtterance) {
        try? AVAudioSession.sharedInstance().setActive(true)
        try? AVAudioSession.sharedInstance().setCategory(.playback, options: .interruptSpokenAudioAndMixWithOthers)
    }

    func speechSynthesizer(_ synthesizer: AVSpeechSynthesizer, didFinish utterance: AVSpeechUtterance) {
        try? AVAudioSession.sharedInstance().setActive(false, options: .notifyOthersOnDeactivation)
    }
}
The key components of this Speaker class I’ve created are the AVSpeechSynthesizer which we need to retain a reference to along with the AVSpeechSynthesizerDelegate which will allow us to change the AVAudioSession when speaking starts and finishes. In this case I’m using the .interruptSpokenAudioAndMixWithOthers category which will ensure our audio plays alongside music but will temporarily pause any spoken audio content such as podcasts or audio books.
To do the actual speaking, we just need to create an AVSpeechUtterance with our string and then pass that to the synthesizer using speak(). With that, we have a working text to audio system using the default system voice.
At our call site, it takes just a single line of code to get our device to speak:
// Singleton approach
Speaker.shared.speak("Hello, world!")

// Using the object only within a specific controller
let speaker = Speaker() // make sure this is retained
[...]
speaker.speak("Hello, world!")
Using System Voices
Where things get more interesting is that we can allow the user to choose a specific voice to be used. You can fetch an array of AVSpeechSynthesisVoice by calling AVSpeechSynthesisVoice.speechVoices() and then use them directly with an utterance or by looking them up by their identifier:
// if you have a reference to your AVSpeechSynthesisVoice
utterance.voice = voice

// if you have only stored the identifier
utterance.voice = AVSpeechSynthesisVoice(identifier: identifier)
Within Chaise Longue to 5K, I list all of the English voices in a UIMenu and let the user pick one. The identifier is then stored in UserDefaults and I use this identifier whenever I want the app to speak. Should a voice ever be unavailable (more on that shortly) then using an unknown identifier will cause the system to simply use the default voice. You can also use AVSpeechSynthesisVoice.AVSpeechSynthesisVoiceIdentifierAlex to get the identifier for the default “Alex” voice.
Locales
When you fetch voices you’ll discover that there are a lot of them. In fact, there are over 150 preinstalled on iOS 17. This is because there are several default voices for most major languages. Due to this, you’ll likely want to filter out any that aren’t tuned to the language you are planning to speak or to the user’s own language. Apple provide a AVSpeechSynthesisVoice.currentLanguageCode() method to get the current BCP 47 code of the user’s locale as this differs to the identifier you may usually fetch via Locale.current.identifier2.
// getting only the voices available in the user's current locale
let voices = AVSpeechSynthesisVoice.speechVoices().filter({$0.language == AVSpeechSynthesisVoice.currentLanguageCode()})
Enhanced and Premium Voices
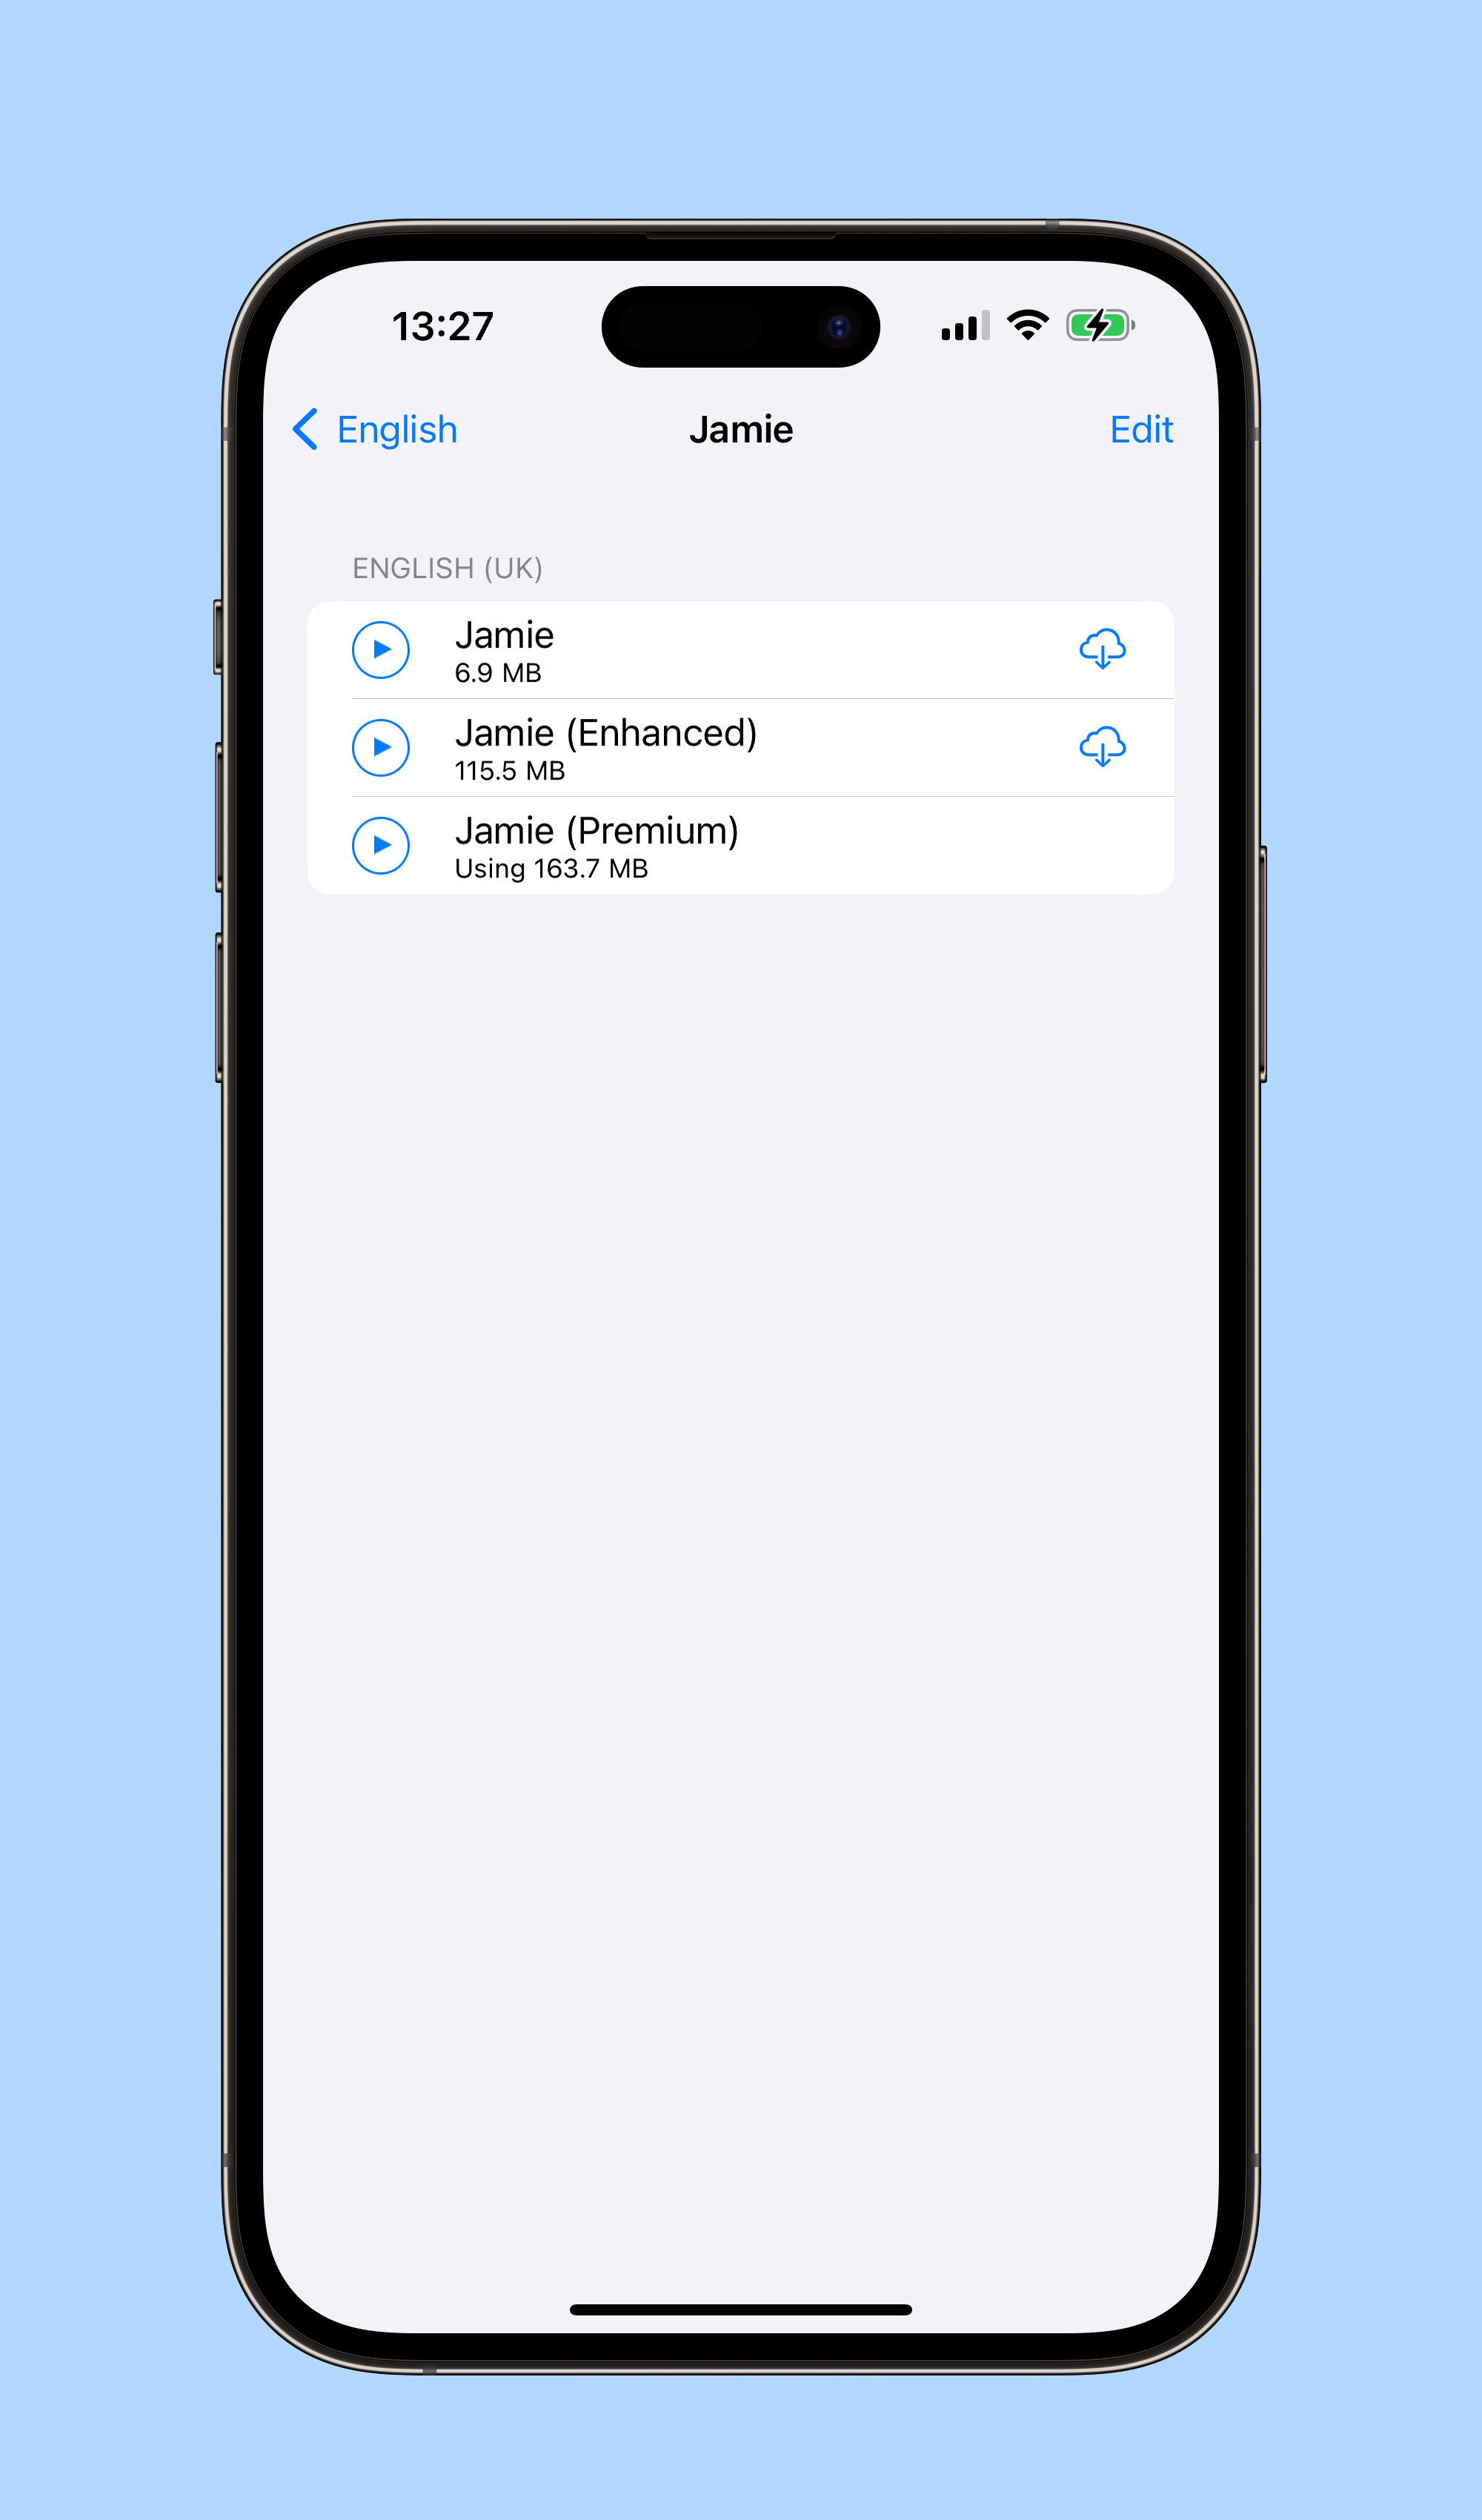
With our voices filtered by locale, the next item of interest is the quality parameter which tells us whether our voice is default, enhanced, or premium. All of the preinstalled voices are default and it shows 😂. iOS 16 added the enhanced and premium voices but you have to manually download them as they are each over 100MB. To do this, you need to go to Accessibility > Live Speech > Voices3 within the Settings app. Here you can browse all of the voices and download any additional ones you may want. Once they are downloaded, you’ll be able to use them within your own app.
// only enhanced voices
let voices = AVSpeechSynthesisVoice.speechVoices().filter({$0.quality == .enhanced})

// only premium voices
let voices = AVSpeechSynthesisVoice.speechVoices().filter({$0.quality == .premium})
As these downloaded voices can be deleted by the user, it’s worth checking that the voice still exists if you’re letting a user choose a specific voice in your app (although, as mentioned earlier, it will fall back to the default voice if you provide a now invalid identifier).
Novelty Voices
In iOS 17, Apple added a number of novelty voices to the system. These range from cellos that speak to the cadence of Edvard Grieg’s “In the Hall of the Mountain King”4 or alien voices in the form of Trinoids. There’s also a really creepy clown that just laughs as it talks. I don’t know why anybody would actually want to use these but if you do it’s as simple as filtering by the isNoveltyVoice trait:
// only novelty voices
let voices = AVSpeechSynthesisVoice.speechVoices().filter({$0.voiceTraits == .isNoveltyVoice})

// only non-novelty voices
let voices = AVSpeechSynthesisVoice.speechVoices().filter({$0.voiceTraits != .isNoveltyVoice})
These are only available in en-US but it may be worth specifying this in case they get ported to other languages in a future update. Depending on your app, you may also want to filter out these voices from your UI.
Personal Voice
Personal Voice was announced in May 2023 in advance of it’s debut in iOS 17:
For users at risk of losing their ability to speak — such as those with a recent diagnosis of ALS (amyotrophic lateral sclerosis) or other conditions that can progressively impact speaking ability — Personal Voice is a simple and secure way to create a voice that sounds like them.
Users can create a Personal Voice by reading along with a randomized set of text prompts to record 15 minutes of audio on iPhone or iPad. This speech accessibility feature uses on-device machine learning to keep users’ information private and secure, and integrates seamlessly with Live Speech so users can speak with their Personal Voice when connecting with loved ones.
Essentially, Personal Voice is using on-device AI to create a private recreation of your voice. What I hadn’t realised at the time is that apps are able to use these user-created voices if the user allows it. What better motivation for my running app than having you speak to yourself!
To create a Personal Voice, you need to go to Settings > Accessibility > Personal Voice and then choose “Create a Personal Voice”. You’ll read out 150 text prompts (which takes around 15 minutes) at which point you’ll need to leave your device connected to power and in standby mode so it can do the necessary algorithm crunching to generate your soundalike. In my experience, this took around 3 hours on an iPhone 15 Pro Max.
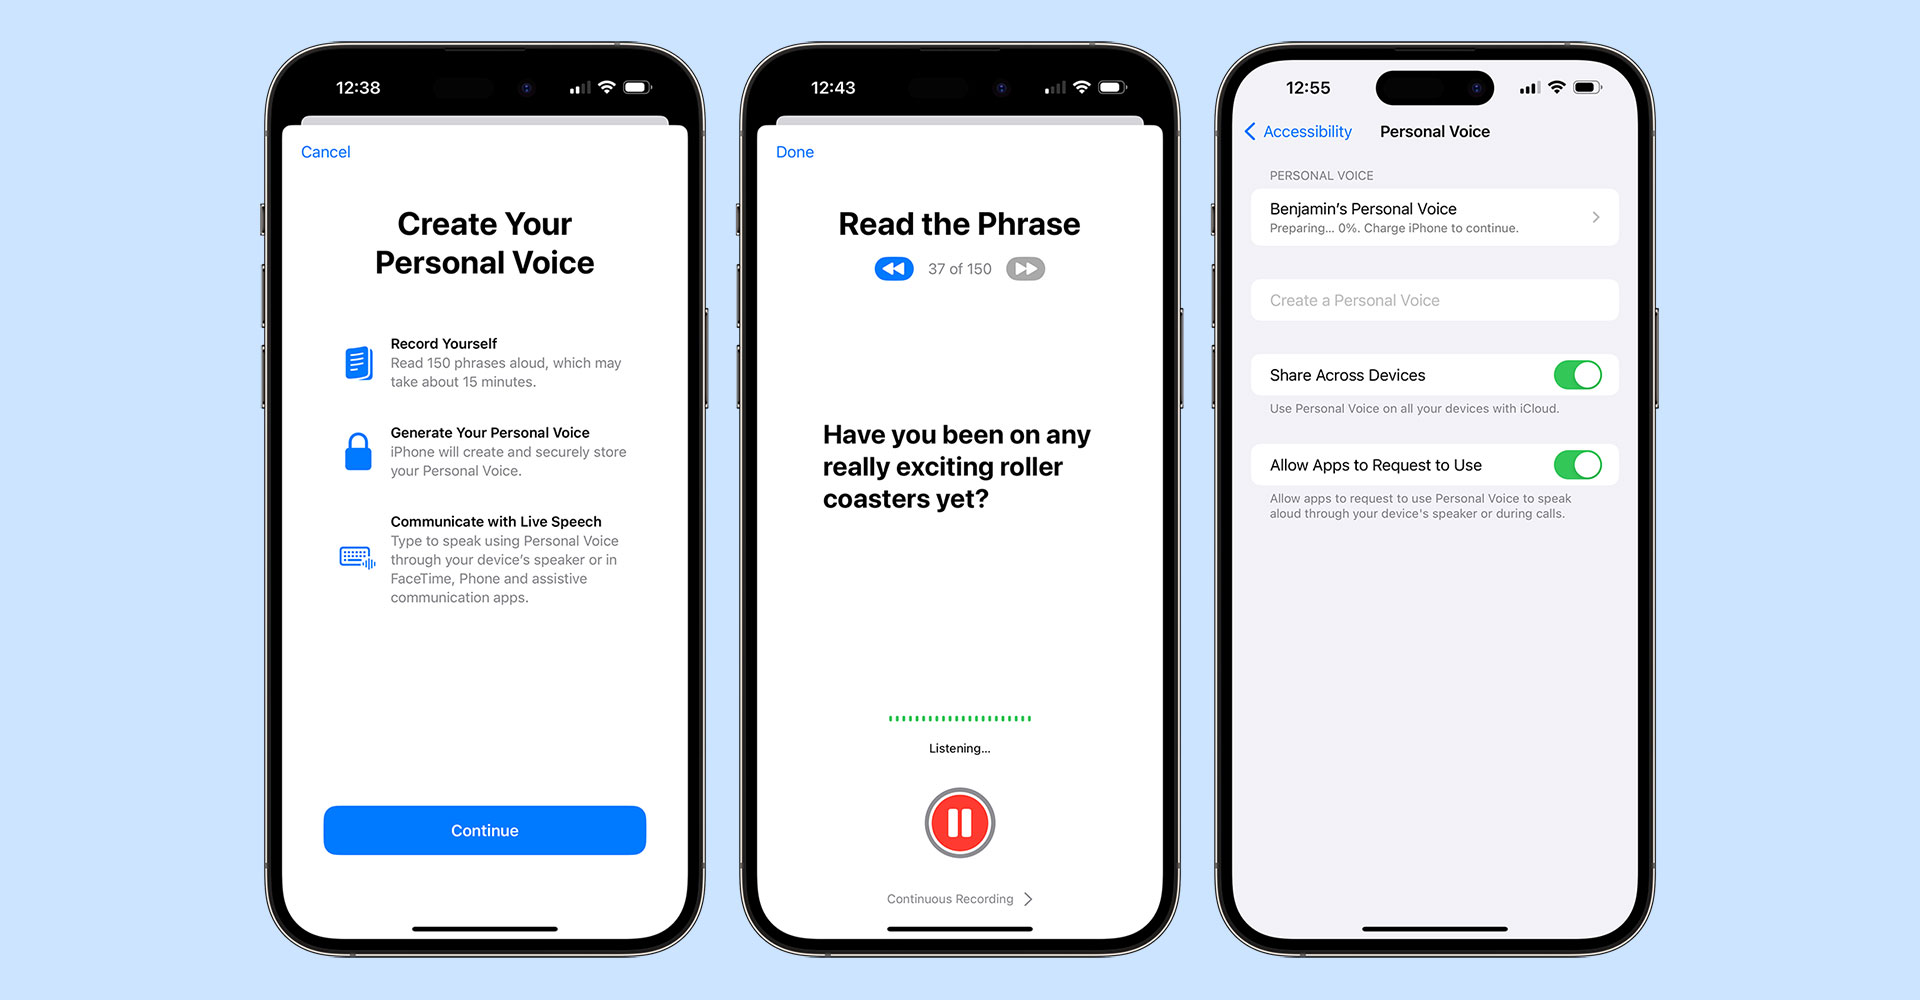
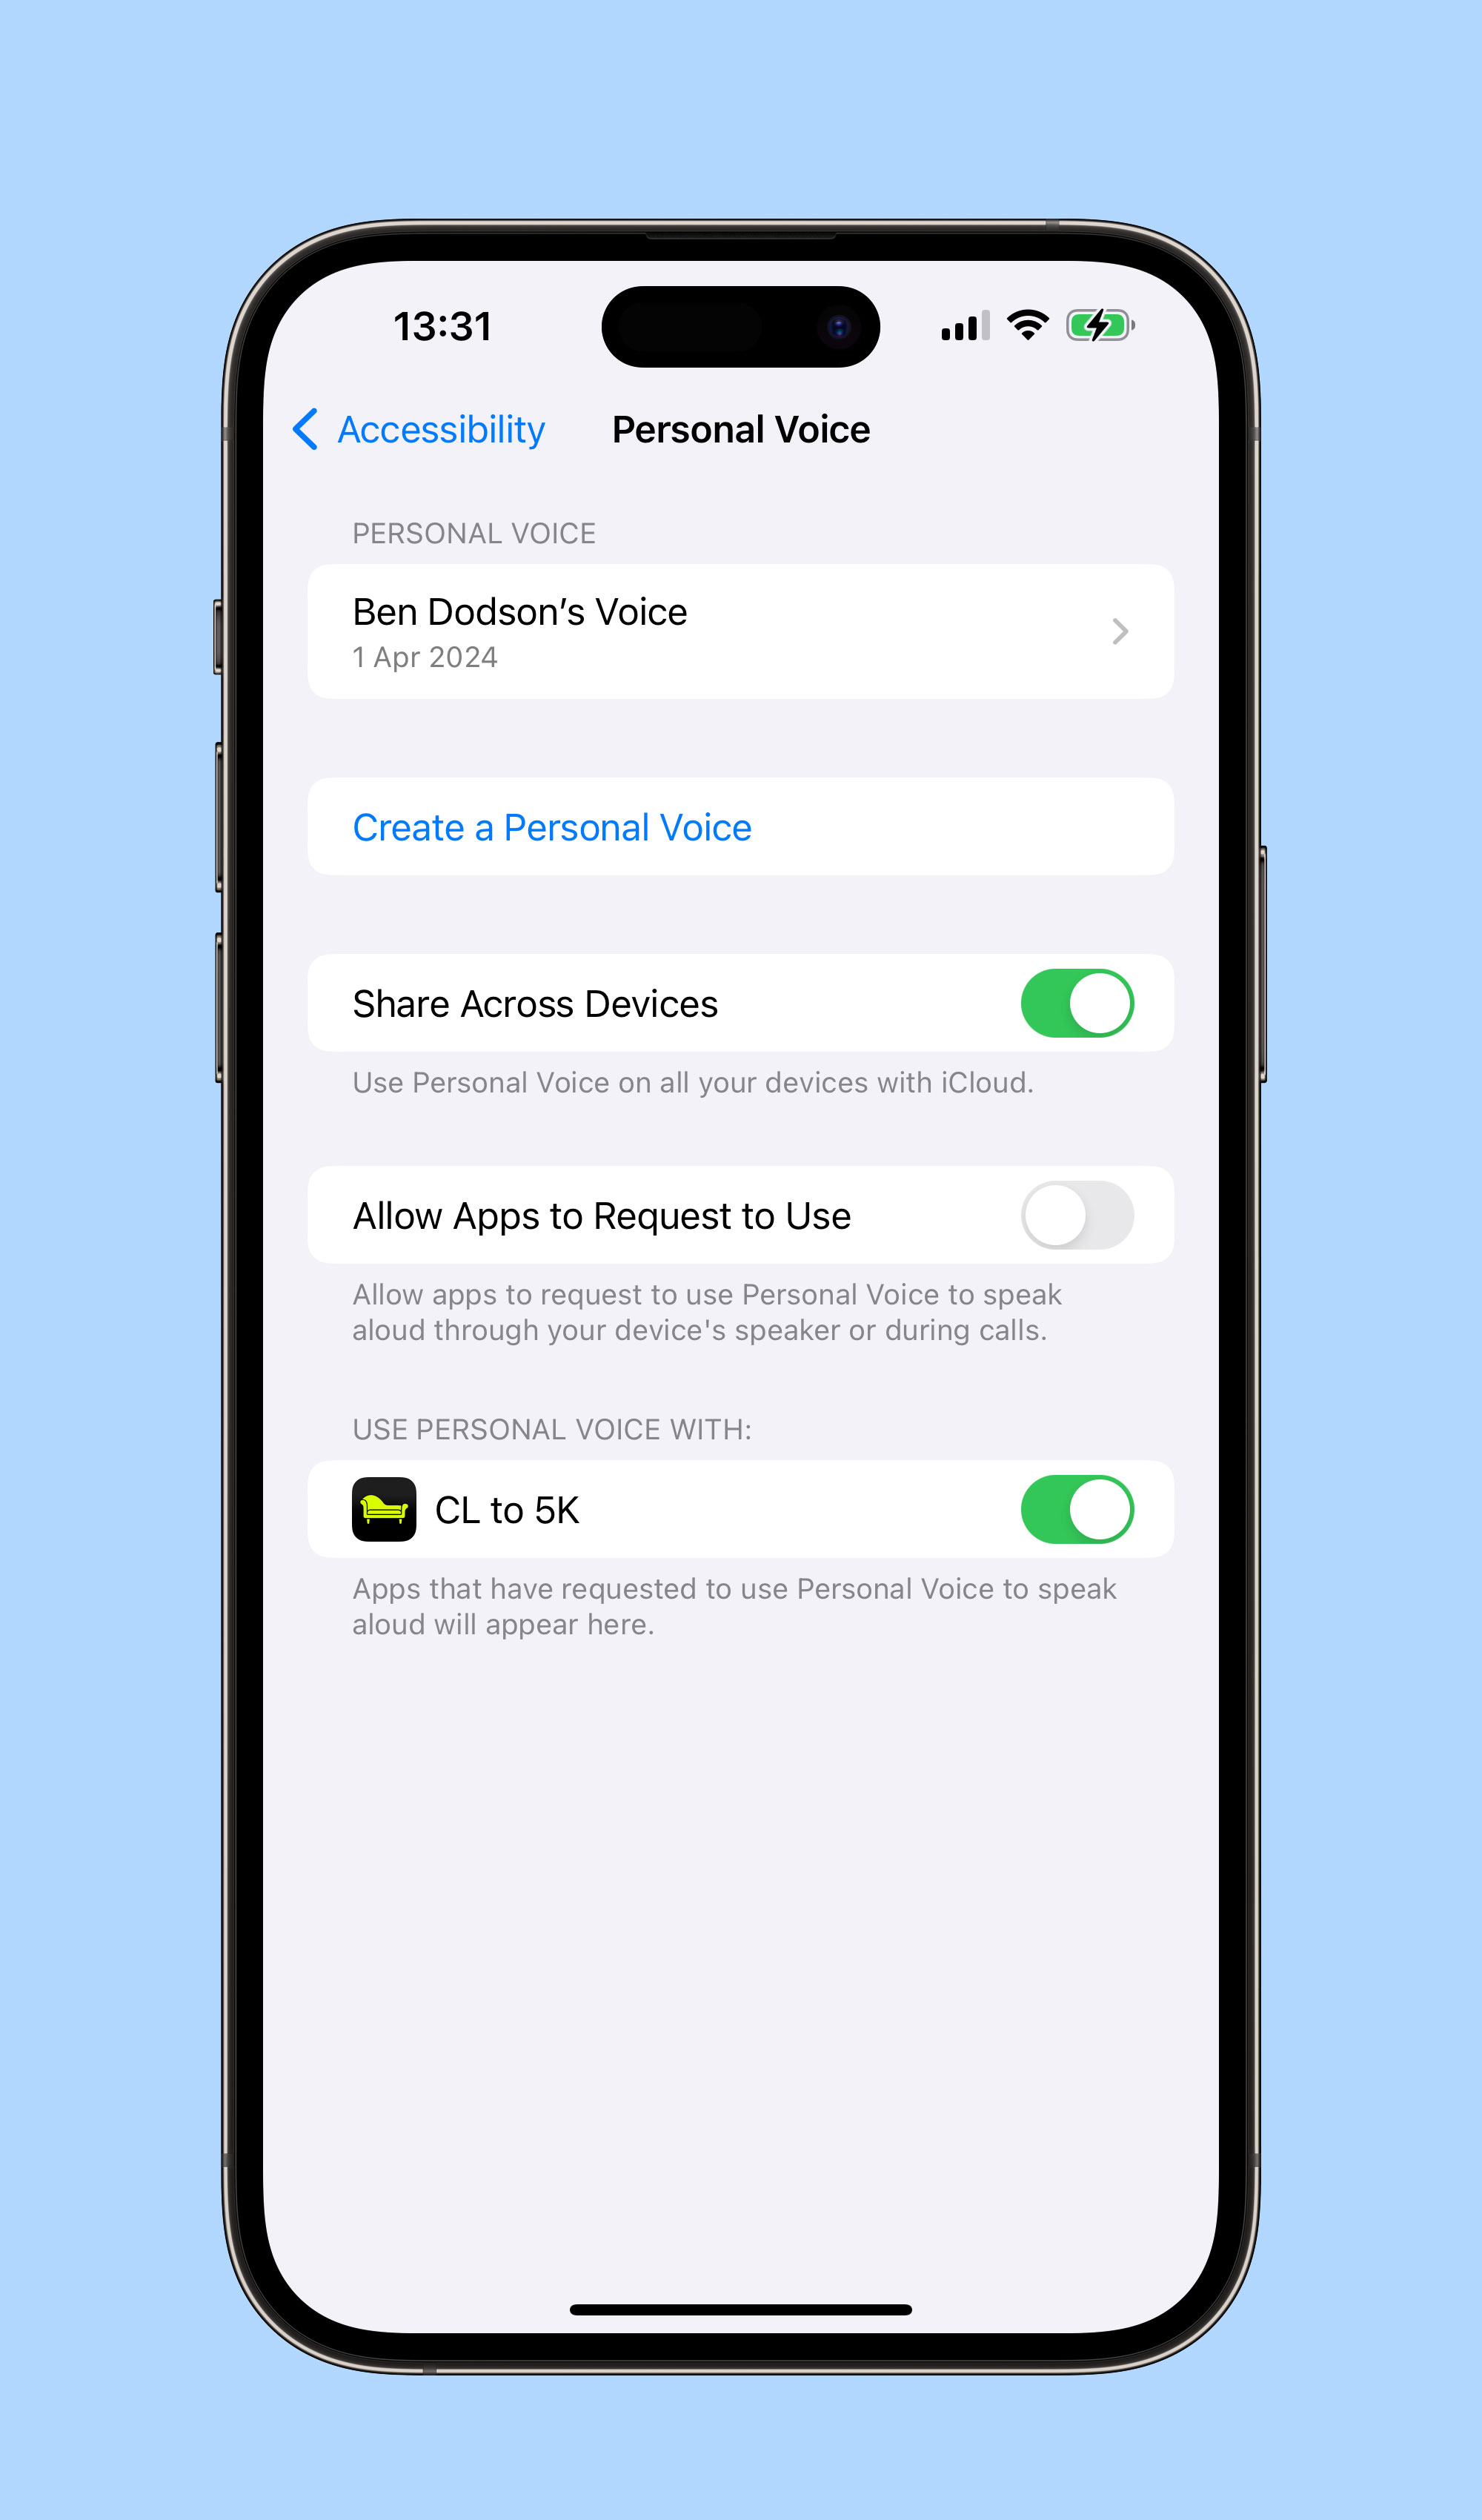
Once completed, there is a crucial button you’ll need to enable if you want your voice to be available to other apps; the aptly named “Allow Apps to Request to Use”. This does not magically make your voice available to be used in other apps but allows apps to request the permission, otherwise any request is automatically denied. You can also choose for your voices to be synced across your devices although this currently only extends to iPhone, iPad, and Mac and as yet I’ve not managed to get it working correctly.
Now we have our voice, let’s look at how we can access it within an app:
// request permission
AVSpeechSynthesizer.requestPersonalVoiceAuthorization { status in
    // check `status` to see if you're authorized and then refetch your voices
}
As soon as the authorization is granted, personal voices will appear within AVSpeechSynthesisVoice.speechVoices() with the isPersonalVoice trait. This means you can filter voices to just Personal Voices very easily:
// fetch only personal voices
let voices = AVSpeechSynthesisVoice.speechVoices().filter({$0.voiceTraits == .isPersonalVoice})
The user can choose to remove authorization for your app at any point in the Personal Voice settings panel either by turning off the toggle for your app or by disabling the “Allow Apps to Request to Use” toggle. This is slightly confusing as if you disable requests your app may still be toggled on making it seem like it would work. Your app settings also do not contain any mention of Personal Voice, even when enabled, so you can’t link to UIApplication.openSettingsURLString to get the user to view these settings.
To further confuse things, Personal Voice only works on iPhone, iPad, and Mac and only on newer models. There is an .unsupported value for PersonalVoiceAuthorizationStatus but this is only used when running on the Simulator or using an unsupported platform such as tvOS, watchOS, or visionOS; it is not called when trying to run on an older device in a supported platform (i.e. a 2nd Gen 11” iPad Pro) with .denied being sent back instead. Do bear this in mind when crafting any alert text you may display to users when they are trying to authorize your app!
I hope you enjoyed this tutorial. I’ll leave it to my Personal Voice5 to sign off…
-
The app was designed for Picture-in-Picture mode on an Apple TV so you could see when to run / walk whilst using other apps. I ported it to iPhone, iPad, and Mac with the same feature set but hadn’t added any sounds for those that want to run with their device in standby mode. ↩︎
-
Localewill give you something like en_GB whereas the BCP 47 code is en-GB. iOS 17 did add aLocale.IndentifierTypeso you can callLocale.current.identifier(.bcp47)but this will matchAVSpeechSynthesisVoice.currentLanguageCode()which has been around since iOS 7. ↩︎ -
This is the same on macOS but on tvOS the only way to download extra voices is in Accessibility > VoiceOver > Voice ↩︎
-
Seriously. ↩︎
-
Here’s a transcript in case you can’t listen to audio right now: “Hi, I’m Ben’s personal Voice. I hope you enjoyed this tutorial and have seen how easy it is to incorporate system voices, novelty voices, and even personal voices like this one into your apps. Personal voice will be available in an update for Chaise Longue to 5K very soon and I’m looking forward to seeing how you use them in your own apps in the future!” ↩︎